Monday 7 January 2013

Favourite Products of 2012!

Hello everyone, long time no speak! Today I'll be showing you my most used/favourite products from last year. I can't believe that 2013 is already here, it seems just like yesterday that 2010 was some weird future where hovering cars were sure to be in abundance. Three years later, nothing seems to have even changed but I guess change slowly happens without us even realising. Anyway enough with the rambling, onto the beauty products!


Face:
My favourite moisturiser of 2012 was the Dove body milk essential nourishment for dry skin. Even though this is technically a body moisturiser I also used this on my face before applying my makeup. Its great for dry skin as it is a little thicker than some of the other moisturisers I've used. 


For concealer I really enjoyed the Maybelline Mineral Power Natural Perfecting Concealer. I actually bought this while I was at my Grandma's house early in the year (I think around Easter) and we went to a market and I found this (new obviously) on someones stall. Plus it was in my shade!! I'm really upset that this is discontinued, at least it is here in Australia. I might have to check this out on ebay...


Okay, onto foundation, my Covergirl Trublend Foundation in ivory. I didn't know whether to include this or not. I mix this foundation with my other foundations to both lighten them up (all my foundations are just a bit to dark for me) and to make them not quite as heavy as this foundation is very lightweight. I do wear this by itself although its a tiny bit too pink since I have yellow undertones but it blends in pretty well. It feels very silky on the skin and when mixed in with the NARS Sheer Glow in Mont Blanc it makes it the right colour!

My fave powder was the Australis Translucent Ready Set Go Powder. This makes your skin so silky and flawless. Really recommend it!

Blush is one of my favourite makeup items of all time. I love cream blushes especially. This one is from NARS and it is the NARS Cactus Flower Cream Blush. I have a review on this product here


Last of all for the face we have my ultimate favourite product, highlighter! This one is by far the best I've ever used, its from Benefit and its called Watts Up. It is a peachy gold highlighter and when i first bought at the start of 2012 from $55 from Myers I didn't expect to love it quite as much as I do. It works with my pale skin which i didn't think it would and it glides over powder, foundation (everything) without mucking it up. It also lasts all day. I couldn't rave about this product enough! (PS it also smells lovely and last forever)


Eyes:
Last year I tried a few different eye primers but my favourite was definately the Essence I Love Stage Eyeshadow Base. I bought this after hearing Ella (smileycitrus) on youtube rave about it for ages. I've tried the Australis eyeshadow primer and Urban Decay Primer Potion but this remains my fave. The Australis one did't work whatsoever, my eyeshadow seemed to actually crease more with it on! The UD primer is good but you can't buy it in stores in Australia and its really expensive. I like the essence one the best because it actually has a colour to it so while it stops eyeshadow from creasing and fading it also evens out the skin tone on my lids. The only bad thing about this product is that it does crease if you don't put eyeshadow over it (at least on me) so I always make sure to put a matte cream over it.

I picked two palettes from my eyeshadow picks because the first half of the year I used the Too Faced Natural Eye Kit and the second half of the year I used the Stila in the Light palette, both of which are awesome. All the eyeshadows are extremely pigmented and creamy, I especially enjoyed using the mattes last year. 


When I look at them now they look REALLY similar...

For eyeliner I have two liquid eyeliner and one pencil. For the first half of the year I used the Maybelline Line Stiletto and the second half of the year I used the Saavy by DB Brown/Black eyeliner. Both are great for creating winged eyeliner however the saavy one takes some getting used too. The pencil liner I have to show you is the Stila Smudge Stick in Damsel which came in the In the light palette. This is a great liner and it stays on all day without budging.


Lips:
My favourite red lipstick of 2012 was MAC Chile which is a gorgeous burnt orangey red. I bought this while I was in London and whenever I wear it, it reminds me of my trip. It is a matte colour which is my favourite finish. I have a review of this here.


Another one of my favourite lipsticks last year was the Sportsgirl Tangerine Queen lipstick. This is by far the brightest lipstick I own but I still wear it to school as it really makes a statement. Oranges really suit me and this neon one is awesome! It is also a matte finish however this product is discontinued but hopefully Sportsgirl repremotes this shade! A good dupe (or so I have heard) is MAC's morange.


I really got into lip stains last year and my favourite was the Covergirl Outlast lipstain in 402 Scarlet Pucker. I wish these markers didn't dry up so fast because the colour was/is gorgeous. It still is usable but not nearly as bright as the testers in priceline were. I'm pretty sure the reason that this was so dry when I bought it was because they stored them upside down. (with the tip facing up) I'm not positive that is the reason but I'm sure that it contributed to the fact that it wasn't as pigmented as the testers. Still, smells and looks gorgeous on however isn't the most long lasting thing in existence. This year i want to try some more stains.


Last for the lips is this lipliner from Elizabeth Arden in Taupe. This colour really compliments my skin tone and it is also matte which is always a positive in my books.


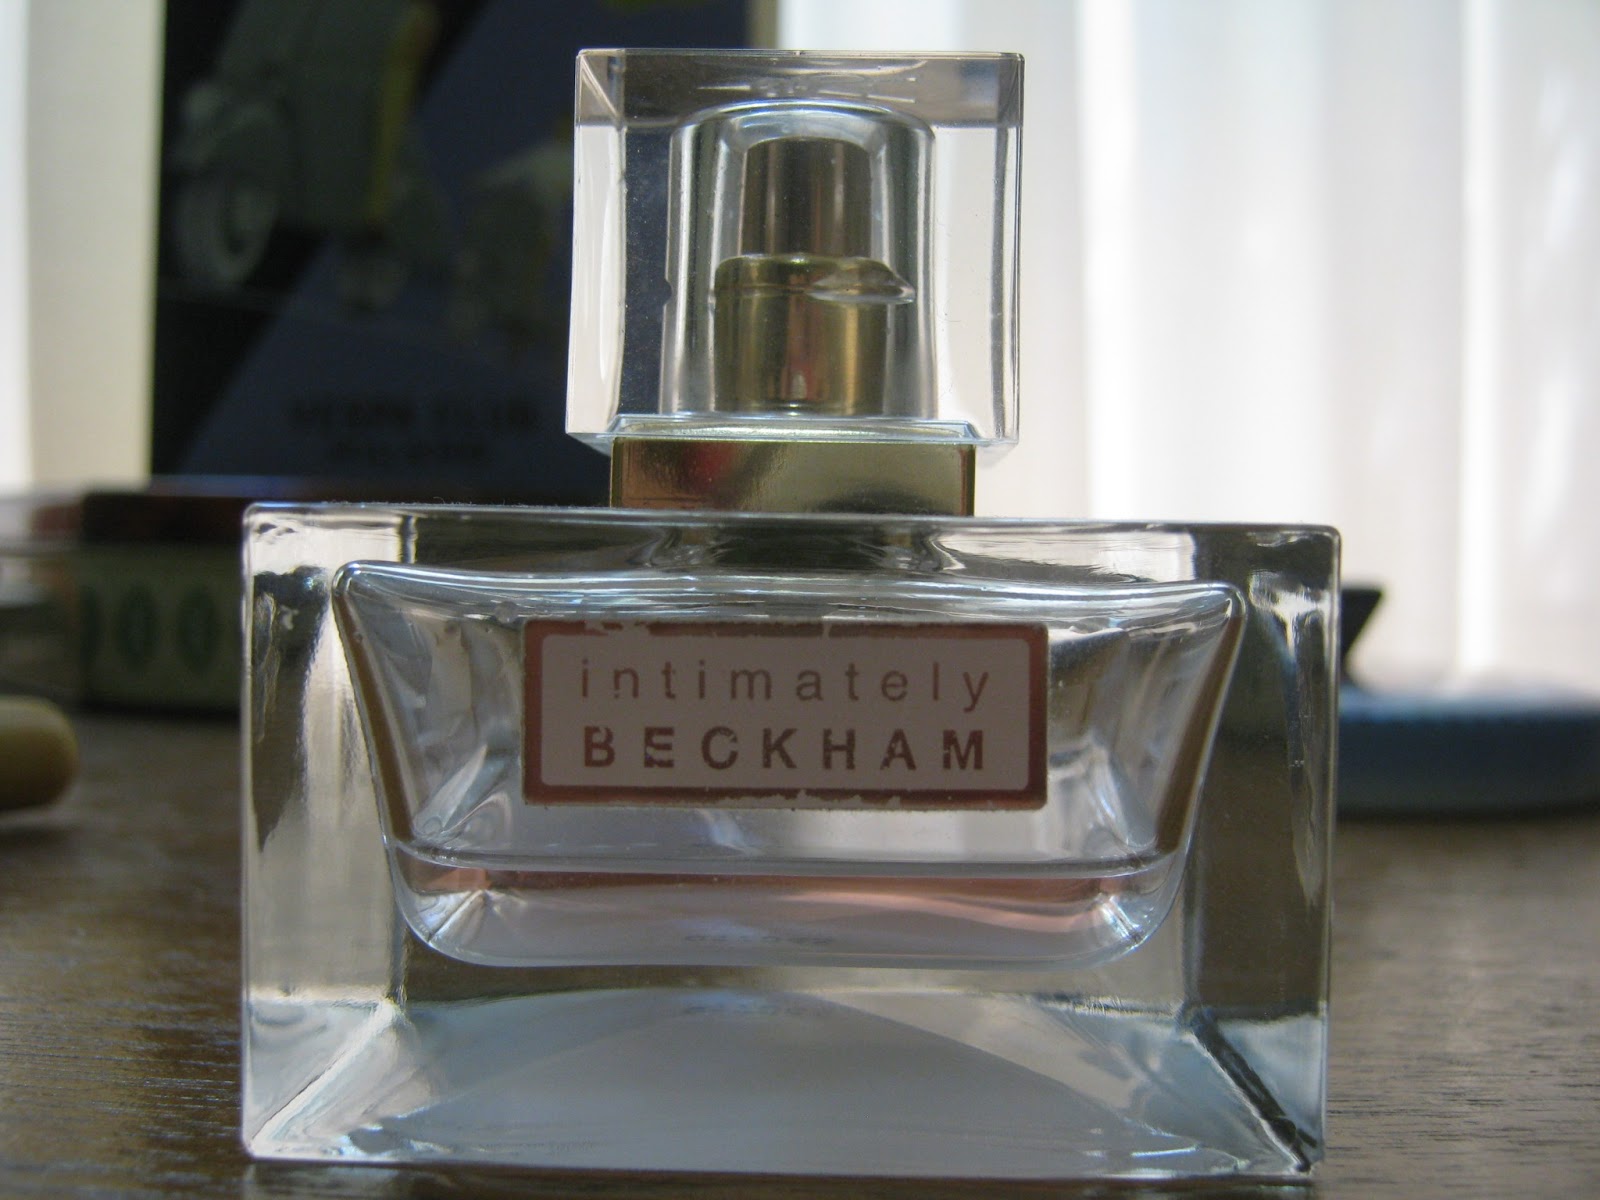
My fave perfume is Intimately Beckham by David Beckham. This is a super florally scent that is utterly heaven!


Last product of all is this brush by ecotools. It is their Buffing Brush. I bought this after seeing the real techniques brushes in priceline and thinking this was a cheaper alternative. I was not disappointed, this is a fantastic brush for blush.


Well that was a lot of typing!! I had a really good year last year and I hope 2013 is just as great. 
Thanks for reading!

What's your favourite products of 2012? Any the same as me?


Sunday 28 October 2012

NARS Cactus Flower Cream Blush


Hello again everybody! Today's going to be another quick (really quick) post about one of my new favourite blushes. Again, something I bought overseas, but this beautiful blush is still available from Australia in Mecca Stores for a bit of a higher price. ($45 AUD)

Hopefully I will get around to taking better pictures (I took this one overseas, it being one of the only pics that wasn't blurry - sorry!) so that I can really show you the shimmer and maybe even the texture. Anyway onto the review...
At first I was actually sort of disappointed with this. Its not as creamy as the rest of my cream blushes and it made me feel like I had to use a lot to get any colour even though it is really pigmented. If you get me haha! As you can probably guess I love this blush now! It doesn't last as long as a cheek stain but wears much longer than all of the rest of my NYX, Australis and Topshop cream blushes.

If you'd like me to I could do an overviews of all of the stains/creams I have for my cheeks? Just say the words. Anyway overall I would give this a... 8.5/10. Just because even though it is a gorgeous bright poppy colour that really looks great on my fair skin, I think if you were to pay $45 here in Australia you could get something just as nice for less. Although it is pretty awesome... I don't know.

I'll hopefully (crossing my fingers that future me does this) take some better pictures of swatches etc.
Bye for now guys!
Have you tried any cream blushes? What are your favourites? I'd love to know!

Saturday 20 October 2012

M.A.C Chile Lipstick Review

Hey everyone, sorry for the MIA thing. Since I last talked to you I have been over to Europe! I can't believe it, everything was incredible over there. Anyway I thought I should just jump back into everything and I'm starting off with...(even though you already know because its in the title..) a M.A.C lipstick review!

The lipstick I am going to review is called Chile and it is a gorgeous orangey-red.
M.A.C Chile lipstick $35 AUD
I actually bought this while I was in London so I got it a little cheaper (14 pounds) but here in Australia its at a steep price of $35. It is matte lipstick and I thought it was going to smell like vanilla really strongly but it doesn't. This is my new favourite thing to put on my lips. It stays on forever, I swear, I wear it to school and its still there (faded but still there) by the end of the school day. Once I put a stain underneath and this on top and it was still as bright as ever by the end of the day.

Although this is my first M.A.C lipstick, it will definitely not be my last as it is the best formula of a lipstick I have ever tried. 


I hope this review has helped someone! Don't forget to leave a comment! See you next time!

Have you ever tried M.A.C lipsticks? What is your favourite one?

Friday 20 July 2012

My Vintage Bags + Tips on shopping Secondhand!


Okay, okay. Just off the bat, I want to just get you to envision how I thought this post was going to be like. Crisp photos (of excellent quality) with my bags surrounded by beautiful, blooming flowers. Reality is my dad took his camera with him and he is getting back tonight when it will be too dark to take photos and I forgot the fact that there isn't any blooming flowers because it's winter. Yep. So just take that all into account before judging the not so good photos haha.

I had to make the photos a bit smaller this time so that they weren't blurry because I used an ipad to take the photos, (they actually are better quality than I expected) so sorry about that! Also I cut my finger and have a band-aid around it so its a bit hard to type.Anyway, off topic. Onto the bags!


Today I am going to be showing you some of my vintage/vintage looking bags! All of them except one are leather, and all but one I got second hand! At the end of this post I'll include some tips on finding vintage bags cheaply!


So the first bag I'm going to be talking about is this leather satchel. I actually found this randomly in our shed and I cleaned it up a bit. I used leather polish and, for the lack of a better verb, polished the bag up! At the time I found some small squares of floral material and stuck them onto the straps on the front with paperclips. Although last time I used this bag was for my school's athletic day and they kept falling off and I have yet to put them back on...whoops!


This bag I got for my birthday last year, it was from ebay. I was just looking through my archive purchases on ebay for about 5 minutes trying to work it out haha and the seller I got it from doesn't sell them anymore but hopefully you'd be able to find something similar on there. Anyway, I really love this bag as it's, "genuine leather" is of great quality and smells really good. I got it in dark brown so that it would go with everything I have. The one thing I don't like about this bag is that it came squished in the post (it was meant to be like that) and I haven't been able to 'plump' it back up. Any tips? I've tried stuffing newspaper for ages and it doesn't seem to work.


Now, this one has been a recent favourite of mine, its so handy and so cute! It's got an adjustable strap and its a really good size. I got this one from an op-shop but I can't remember exactly for how much. I'm sure it wouldn't of been over $15. How adorable is the greyhound? (it IS a greyhound right? haha)


I got this bag from a family friend. It's not real leather but I love it anyway. It has a really nice clasp and does really look vintagey. I also really like the handle on the top.

Sorry about the quality of this one haha
Finally is this little beauty. (I felt so Australian saying, sorry writing, that) I got this on the donations tables at a local garage sale (I love those things when I can be bothered getting up early enough which is hardly ever) and it would have been free but I felt bad, like I was stealing or something, so I gave $2. Great bargain! Its real leather and its just like the ones you see in pretty much every shop, but so much better quality! Arr, I still can't believe how great this is!

Okay, although they aren't ALL my bags, thats all my favourites so I thought I'd show them to you! Hopefully you find some inspiration from them.

Onto my tips for finding vintage bags for cheap! (Or anything you want)

Tip 1) Don't worry if you don't find what you are looking for every time you go to the op-shop or a garage sale, you'll find something you like eventually. (Eg. I really wanted the video Anastasia - love that movie- and I looked in every single opshop and I found it in like 2 weeks, haha random example but whatever!)

Tip 2) Stuff ALWAYS looks better once its home and washed, keep that in mind

Tip 3) Be warned, you have to look through a lot of, excuse me, crap to find one good thing, don't give up!!

That's pretty much it for today, I'm actually pretty tired because I have been sick recently (from being tired) and I have lots of homework this weekend to do *cries* but oh well. It has to be done haha. Anyway I hope you enjoyed, see you!

Verity x


Do you shop in op-shops or go to garage sales?

Monday 16 July 2012

DIY Denim studded shorts! (Inspired by Arose186!)


Hello! Today I am going to show and tell you how I made these cool vintage-y studded denim shorts. First of all, I got inspired to make these shorts from the awesome Arose186 on youtube! (Just click on her name to view the video she made where she studded her shorts!) I actually made these at school in my creative textiles class, (sewing class) but I thought it would sort of be cool to show you guys how I did it!

For this project you will need:

  • Old pair of jean or shorts (I got an old pair of jeans from the op-shop (thrift store) for $1)
  • Scissors
  • Around 60-100 Material studs or studs used in scrap booking (I looked everywhere and eventually found them in a scrap booking shop but look in the warehouse or someplace similar for a cheaper alternative. Another place to look is on ebay.)
  • Quick unpick
  • Pencil
  • Ruler/Tape measure
I used both round and square gold studs
Step One
If you are using an old pair of shorts, you can either cut off a little one the bottom of the legs to go for a more distressed look or keep the edges intact. If you are using a pair of jeans, you will need to carefully lay them onto a flat surface, making sure there are no creases or folds. Measure how long you would like the shorts to be, (by either putting them on and measuring or by using a tape measure when they are laying flat) and rule a line across both legs with a pencil. Cut carefully. Your jeans are now shorts!!


(If I didn't explain well enough and you are still unsure, there are plenty of youtube videos on how to cut jeans into shorts! Here is the link to the video I used when cutting my jeans!)

Step Two
Now its time for the fun bit, studding!
Since the studs I was using were made to go through paper, not denim, I had to use a quick unpick to make a small hole through the denim before I could even think about putting in a stud! After I did that it was quite an easy process.  I made mine with a little bit of a gradient, so it had a lot more studs up the top and fewer and fewer as it went down. (The studding process took me about 1 hour give or take) It did get a bit repetitive though... but don't worry, it will be worth it! 


Step Three
Once you have finally finished studding those shorts, you will be nearing the end! (Phew...) Now its time for the finishing touches! I got my friends to actually fray the bottom edges of the shorts by just pulling on any loose threads, just to give it a distressed look. I think this means your done! You can add anything you like, buttons, lace, customized belt... anything! Enjoy!

I hope I helped at least one person with this post! Tell me if you liked it! See you! 

Verity x


Saturday 14 July 2012

Review: Lee Stafford Argan Oil from Morocco


'Lee Stafford Argan Oil, Nourishing miracle Oil'
Hello Everyone!


Today, for my very first blog post (!!!), I'm going to be reviewing the, 'Lee Stafford Argan Oil from Morocco, Nourishing Miracle Oil' which retails for $19.99 in Priceline, Australia. I personally got this for $16.99 on sale, the sale is still on right now, so go check it out!

I had been wanting to try some sort of hair oil after hearing such great things about Moroccan oil specifically, but I was more inclined to buy this oil because it was cheaper.
The product comes in a plastic bottle and has 50ml. (or 1.7 fl.oz) On the back it claims to "...create soft, shiny hair, leaving it in superb condition..." and in 'Lee's top tips' it says that you can apply it onto wet or dry hair.

The oil itself smells quite good, not too overpowering. I use about a pump and a half, (because I have really thick hair) rub it between my palms and put it on my ends. When I apply this into my dry or wet hair it does seem to nourish my hair. I feel like if you had really long hair you would need to use a bit more which is annoying.
One pump of the Argan Oil
I find that it is rather hard to use too much of this oil, although I have never put it near the roots of my hair. I don't know if this does anything that benefits my hair in the long run, but I do know that when I use this, my hair is a lot softer and a lot less dry.

For the price, I think this is worth giving a go, I would wait until this is on sale for the best possible bargain. 

Have you ever tried any hair oils?


Please leave any requests or questions down below, they will be greatly appreciated. Thank you :)